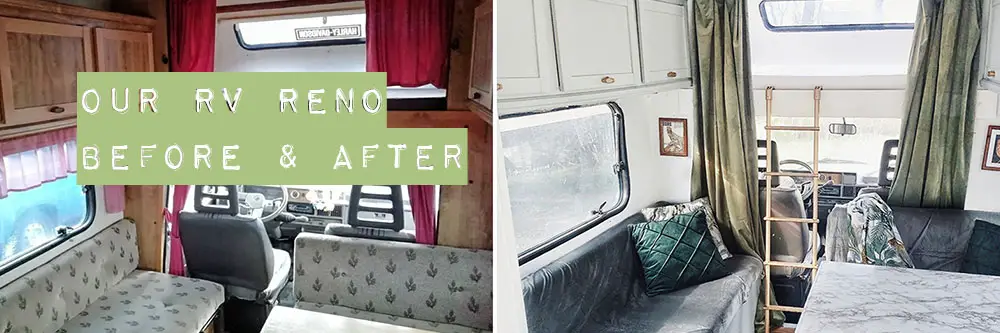
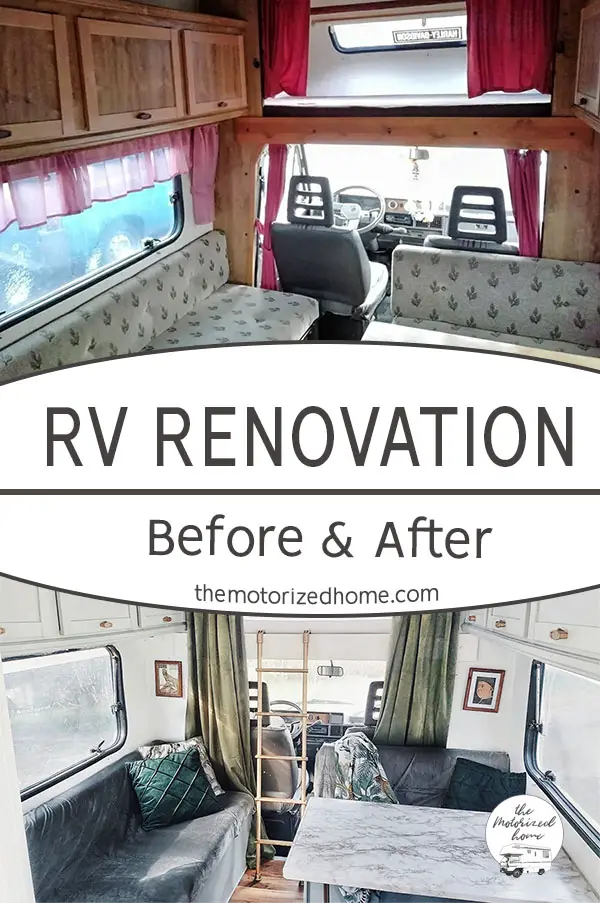
Our $140 Budget RV Reno – Before & After
This post may contain affiliate links to support the upkeep of this blog - at no extra cost to you! Please read my disclaimer for more info.
I’ve been eager to write this post for so long! I’m an absolute before&after photo junkie and I know I’m not the only one, so I wanted to share our progress as before and after shots. Well, technically it’s before and “during”, as I still have loads to do here, but at least we are ready enough to move in. I will make a proper tour around soon! If you don’t want to miss it, join our newsletter at the end of the page!
I also thought I’d include how much we spent, to prove that you can have an inviting, personal space – even with a small budget.
You might also be interested in
80 Jaw-Dropping RV Bathroom Renovations (most of them have before & after photos!)
Easy RV Makeover Ideas on a Budget
20+ Incredible RV Camper Interior Renovations, RV Makeover Before and After Photos
Lounge area
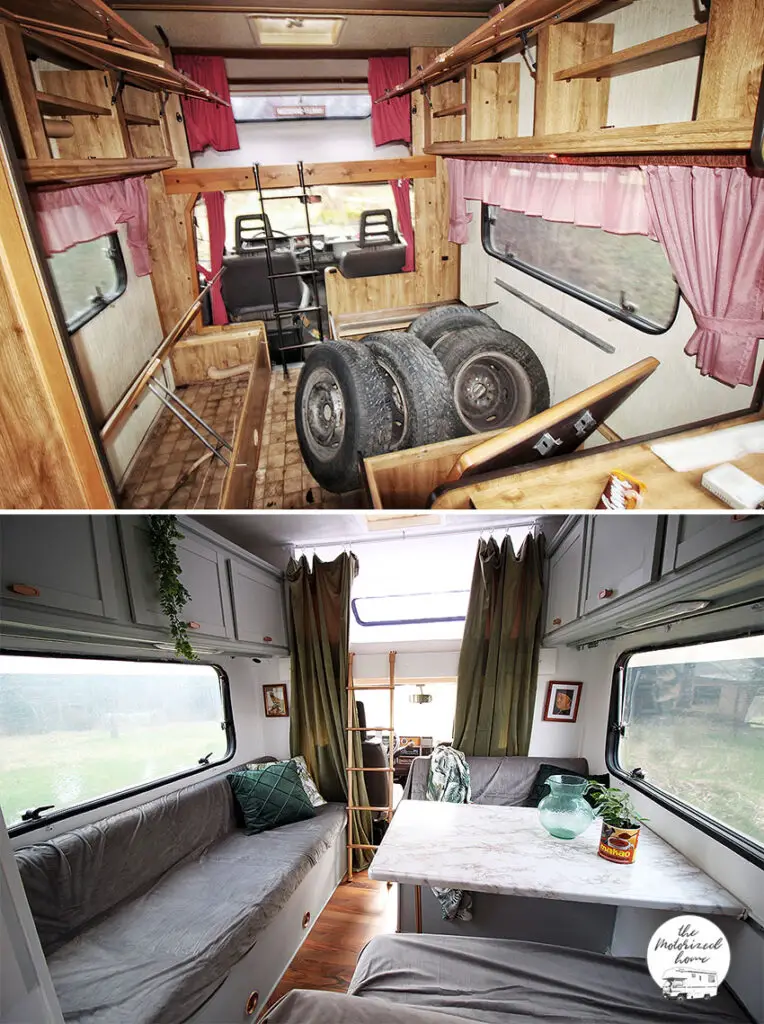
This van was an absolute nightmare when we got it. It was damp, dirty and outright miserable. The floor was 1980s fake tile vinyl, all the curtains were mismatching and wrong size and the color of everything reminded me of tobacco smoke stains. (Luckily no one had smoked inside.) Yikes!
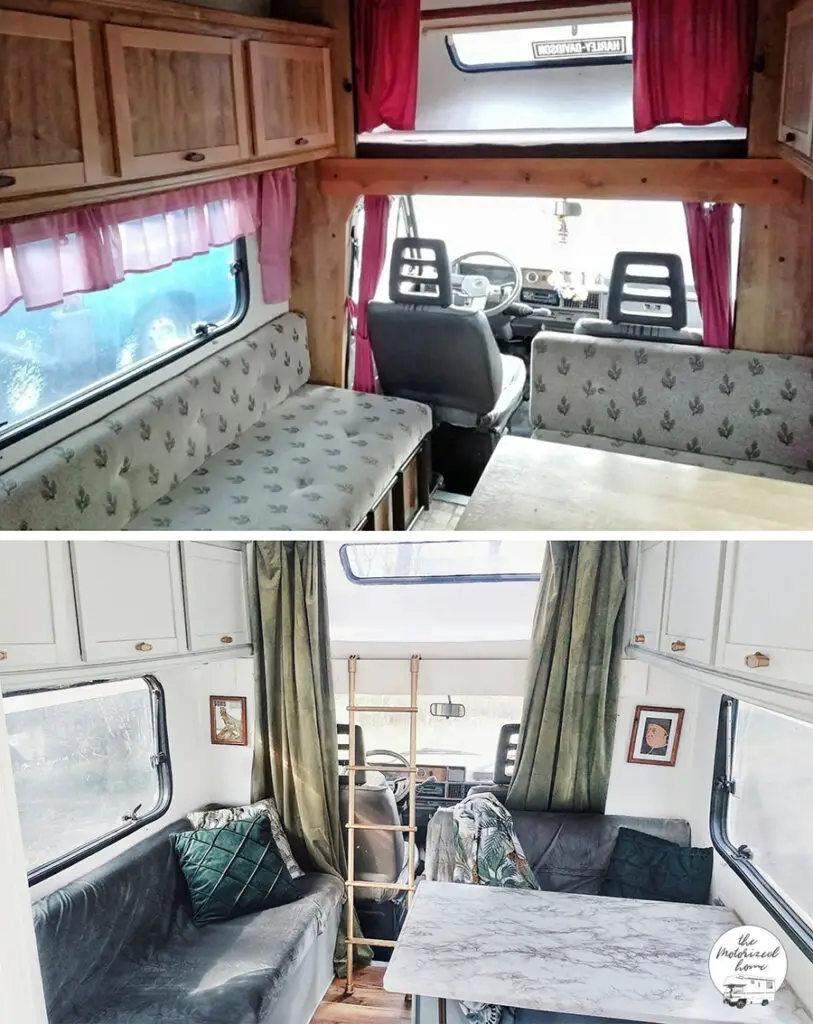
Here you can see the original textiles. I covered them with a grey velvet, I also used velvet in the curtains separating the cockpit and the living area. I wanted to hang them from the ceiling in order to make an impression of higher space. Read more tips on how to make RV feel bigger here. All the walls got a layer of white paint and the cabinets were painted with grey chalk paint. The ladder, table leg and all the cabinet pulls were sprayed with golden spray paint. The hideous floor was covered with wood vinyl planks and the table got marble contact paper covering. Read 20+ other ways to use contact paper in an RV here.
Kitchen
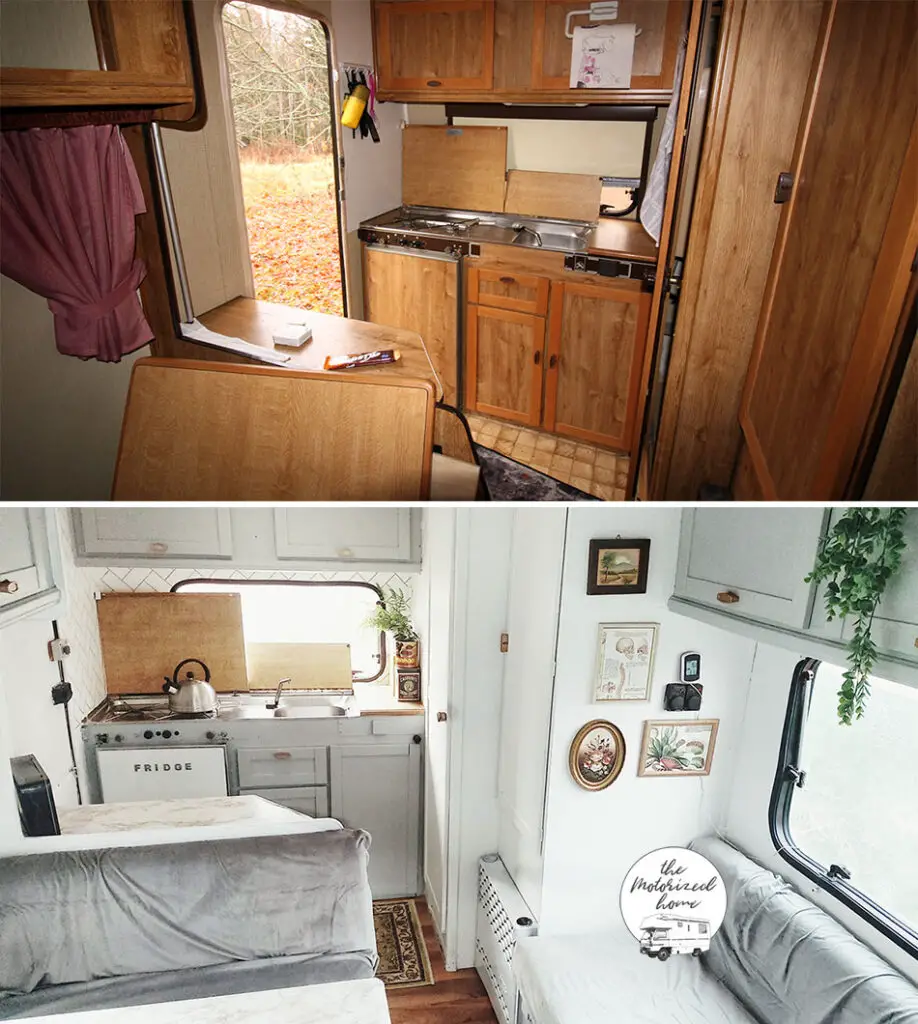
Here you can see the view from the alcove, which also works as our sleeping area. The same grey chalk paint was used on the kitchen cupboards. I also used white hot temperature paint on the heater grille. I added a small gallery wall to make the space feel cozier. Read more easy RV makeover ideas on a budget here.
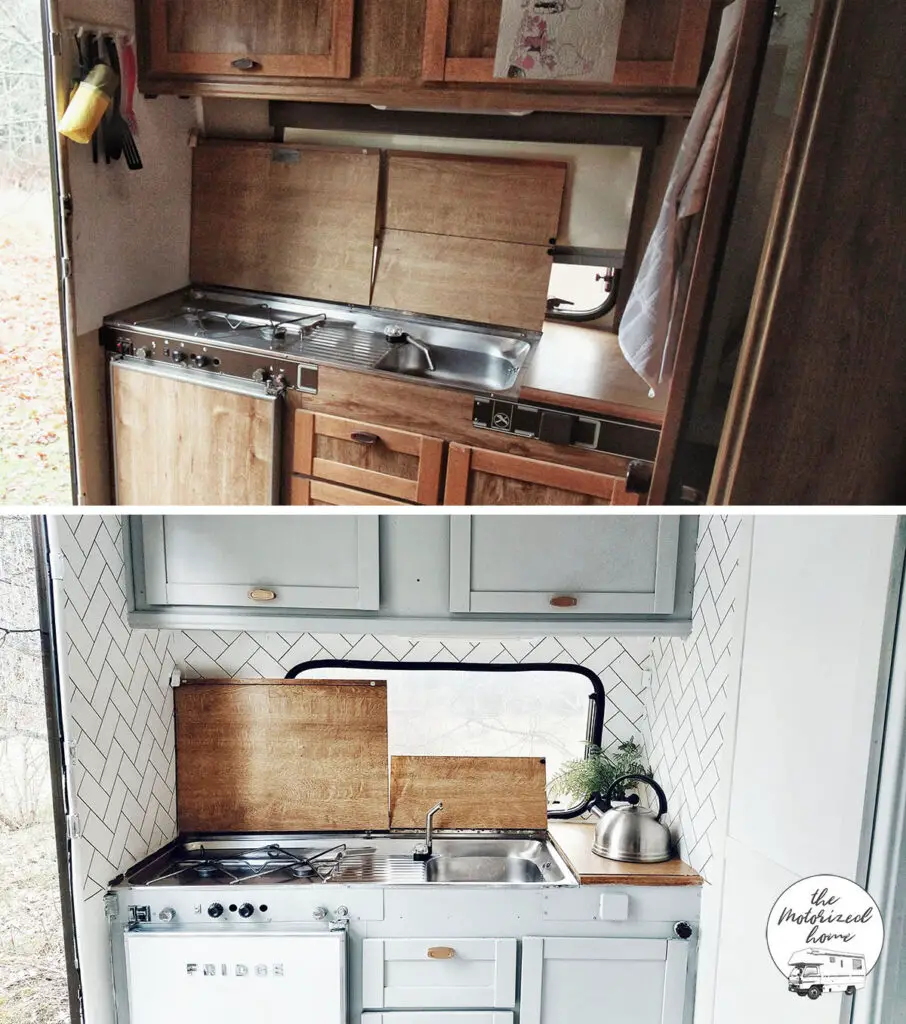
Closer look to our kitchen area. Only original thing left in this van was the kitchen worktop. If you are interested how I made my Herringbone tile backsplash, read more here. The fridge is the original one, but I made it to look like retro, see how I did it here. If you are not into retro look but in need of an inspiration, read 5 more ways to RV fridge makeover here.
As you can see, our kitchen is pretty tiny. If yours is too and you are looking for ideas how to organize it, see my RV Kitchen Organization & Storage Guide here!
Bathroom/Toilet
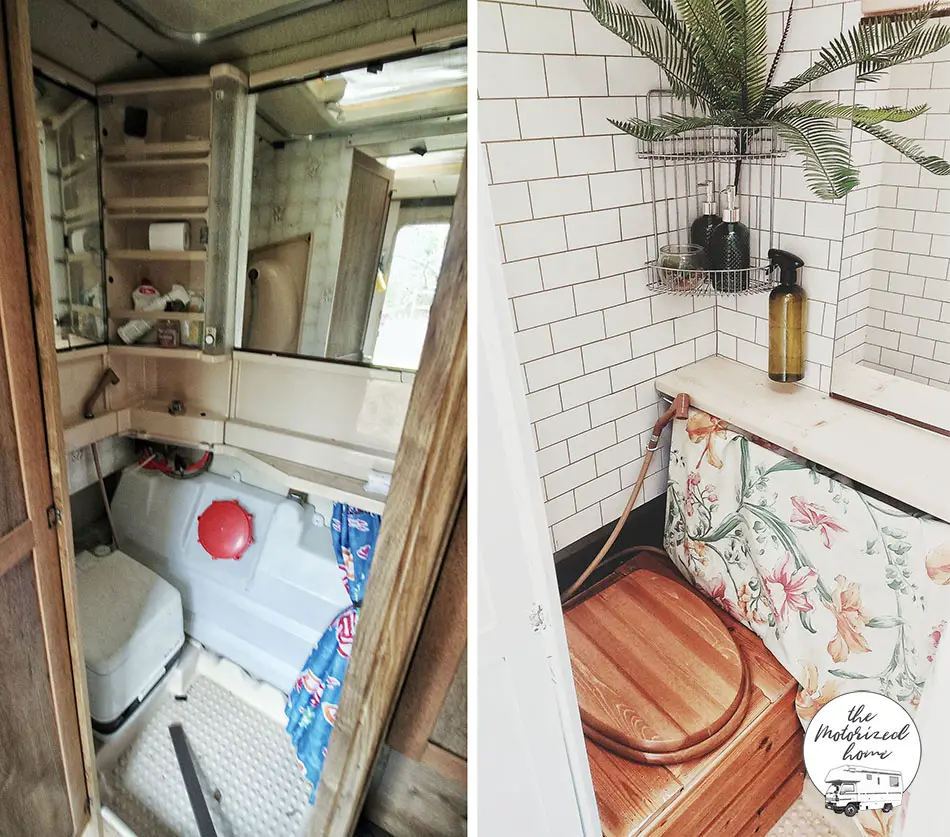
And here is our toilet/bathroom. I tackled this space last, as I must admit I felt really hopeless with it before I started. It is smaller than one square meter, in fact, it is only 0,63 m2 or 6,78 square feet small! Anyway, I’m pretty happy how it turned out. Instead of the old porta potty I built a composting toilet (read here how to avoid my mistakes) and got rid of pretty much everything else too. I drew the tiling on the walls, read more about it here, and build a simple shelf to cover our water tank. It is tall enough that I have planned to build a small wash basin you can pull out from underneath. I’m also thinking about building more storage space. If you want more inspiration how to organize your small RV bathroom, read my RV Bathroom Storage & Organization Guide here!
Alcove
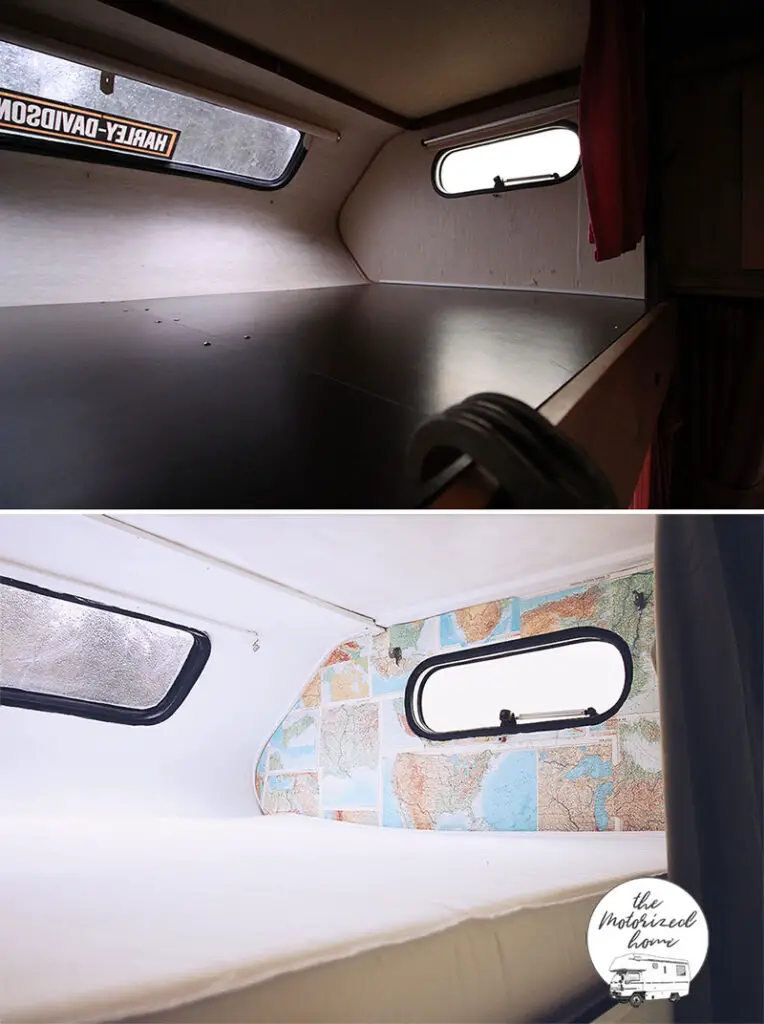
Here is our alcove. It feels so much larger now, thanks to the white paint! I covered both ends with old maps I got from an old atlas, which I bought from a flea market for less than a dollar!
Original Design Plan
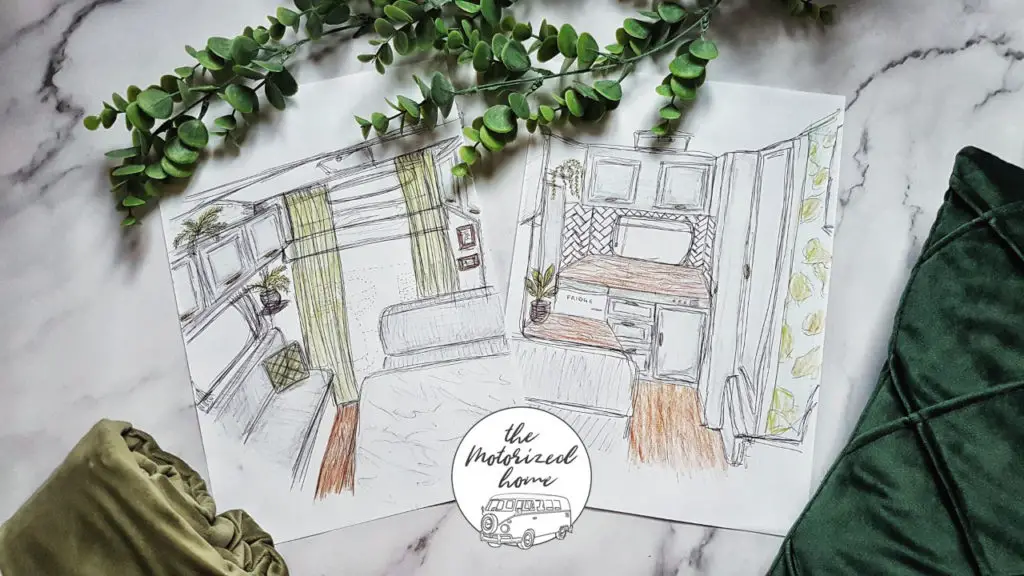
Not exactly a before and after photo, but I thought I’d include it for those planning to renovate their RVs. It is always worth to draw out your plans first! Not only will it make your planning easier, it also helps in moments you feel like it’s never gonna get ready.
So, how much did it all cost?
I have included in this calculation only things that are related to actual decoration (paint, fabrics, contact paper etc.). We had to spend more on renovating costs like new sealants, wall materials etc. The reason why I didn’t include these is that every camper is different and the cost of the water damage repair (if there even is any) depends on how widely it has spread and what materials were used. “Surface makeover” costs are easier to compare.
Paint 2 x 20 + 15 = 55 €
Spray paint 4 + 4 + 9 = 13 €
Fabrics 2 x 18 = 36 €
Contact paper 10 €
Gold pens 5 €
Fridge letters 4 €
= 127 € = 143,89 US$
I already had most of the accessories (throws, cushions etc.) and some things like the flooring was a leftover from another project donated to us.
That’s it for now. This is one of those projects that never stop evolving! I’ll also be sharing later some tips on how to organize a space of this size to fit two people live full-time.
Please let me know what you think!
You might also be interested in
80 Jaw-Dropping RV Bathroom Renovations (most of them have before & after shots!)
Easy RV Makeover Ideas on a Budget
20+ Incredible RV Camper Interior Renovations, RV Makeover Before and After Photos
Save me for later!
You May Also Like
12 Must-Make Tin Can Crafts For Your RV
15 Fresh and Easy RV Bathroom Makeover Ideas